Showing posts with label gift. Show all posts

Tuesday, October 2, 2012

Fun Take on a Picture Frame

I actually did these frames as a birthday present for a friend. You could get creative on what you use for the frame...a block of wood, old cabinet door, etc. I actually have a lot of old wood samples from a furniture company from my work that I used.

What you'll need:
Whatever you are going to use for the main part of the frame
(Cabinet door, block of wood, be creative)
Picture
Accessories to add on
(Metal pieces, appliques, etc.)
Glue

So on these wood samples, one had a lot of texture and the other a lot of wax which makes it kind of hard to glue anything on. I had to use a paint stripper to remove the finish from the raised panel in the center.
(If you are going to do this step have a clean surface that nothing can possibly be ruined if it drips our spills.)
Wear thick rubber gloves, if the stripper gets on your skin it will burn extremely bad. Pour the stripper into something you don't care about: an old bowl our cup. I  used an old coffee pot I bought at the thrift store for a dollar for this very purpose. Use a paint brush and brush on the stripper. Let sit for about 30 mins. Use a paint scraper to scrape off the paint or finish. It may take a few applications to remove everything. Feel free to leave some for a rustic, antique look. When done clean with a damp cloth and let dry completely. I would use an old rag just in case it ruins it.
(Sorry I didn't get a picture of this)

Tuesday, September 4, 2012

DIY T-Shirt Scarves

So...if you are anything like me, you are always looking for new and cute scarves.
Well, if you really are anything like me, you hate paying for them. I am on a bit of a stricter budget,
so any money I can save is great.

I have several bags of old clothes that I keep meaning
to donate but as of right now,
they are dust collectors in my closet.
So, I went rummaging through them to find ones that I liked the fabrics of.

You are going to need:
Old T-Shirt
(The wider it is the longer your strands will be...The longer it is the more strands you will have)
Scissors

First thing you will need to do is lay your shirt out flat.

Monday, April 16, 2012

Flippy Floppies

I have been making these flip flops for years, since I played soccer. They are great for teams, fundraisers, gifts, or just for yourself.

You will need a set of flip flops. You can do a plain or patterned like I did.
The thinner the band across the foot the easier this will be. These particualr ones were a little thick.

Then you will need some fabrics. You can mix solids, use one pattern, or several like I did for this post.
I got these, 5 pieces of 18" x 21" pieces from Hobby Lobby for $9.99. Pretty much anywhere that sells fabrics will sell scrap pieces which are great for this, but don't feel bad to go pick some fabrics from a bolt.

From a Sewing Cabinet to Desk

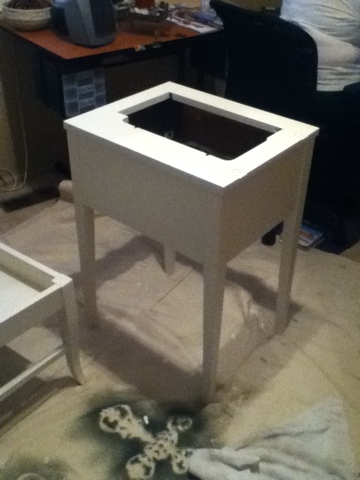
So for Christmas, I decided to make my younger cousin Josie a little desk. She fell in love with one at my work but I was not about to spend $400 on a desk. So I went on the hunt for a small desk and chair, scouring thrift stores and little antique shops. I came across an old sewing cabinet and an old piano chair (one where the seat lifts up for storage) at this great little place in OKC The Feathered Nest. The desk cost me $30 and the chair $24.

I went to Walmart to get some Glidden paint. I bought 2 pints in a soft ivory satin. These cost a total of about $26. Feel free to choose any color. I chose a white to match the furniture in her room. I also wanted it to be a piece she could grow in to.

You'll first want to wipe down the furniture if its a little old and then lightly sand it. It took me about 2 coats to cover it well. Also, if it is in parts like mine was, I suggest taking everything apart and all the hardware off.

To go below the opening in the desk where the sewing machine would typically go (I wanted her to be able to lift the top and have a little built in drawer that she could store her supplies) I bought a simple tray for about $25 and some modge podge for $5 at Hobby Lobby. (Just so you know, most the time they have half the store 1/2 off or you can get a 40% one item coupon on their website every other week.) I then bought some fabric and lining at Interior Fabrics for about $16 total for a yard of each.

I folded it to fit the inside of the tray bottom and used a little spray glue (I recommend using another type of glue if you plan to do this for a tray that you can see every detail because its very messy and stuck to the sides.) I then used a modge podge to make a clear sealant. When doing this over fabric it may take 2 or more coats to get a smooth finish. It took 3 for this tray. (I love it so much I want to make one for my living room.)