So for Christmas, I decided to make my younger cousin Josie a little desk. She fell in love with one at my work but I was not about to spend $400 on a desk. So I went on the hunt for a small desk and chair, scouring thrift stores and little antique shops. I came across an old sewing cabinet and an old piano chair (one where the seat lifts up for storage) at this great little place in OKC The Feathered Nest. The desk cost me $30 and the chair $24.
I went to Walmart to get some Glidden paint. I bought 2 pints in a soft ivory satin. These cost a total of about $26. Feel free to choose any color. I chose a white to match the furniture in her room. I also wanted it to be a piece she could grow in to.
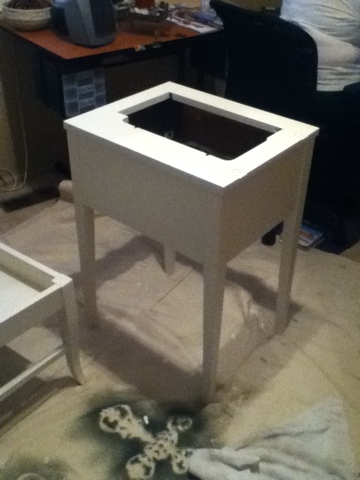
You'll first want to wipe down the furniture if its a little old and then lightly sand it. It took me about 2 coats to cover it well. Also, if it is in parts like mine was, I suggest taking everything apart and all the hardware off.

To go below the opening in the desk where the sewing machine would typically go (I wanted her to be able to lift the top and have a little built in drawer that she could store her supplies) I bought a simple tray for about $25 and some modge podge for $5 at Hobby Lobby. (Just so you know, most the time they have half the store 1/2 off or you can get a 40% one item coupon on their website every other week.) I then bought some fabric and lining at Interior Fabrics for about $16 total for a yard of each.
I folded it to fit the inside of the tray bottom and used a little spray glue (I recommend using another type of glue if you plan to do this for a tray that you can see every detail because its very messy and stuck to the sides.) I then used a modge podge to make a clear sealant. When doing this over fabric it may take 2 or more coats to get a smooth finish. It took 3 for this tray. (I love it so much I want to make one for my living room.)

I then added some L brackets from Lowe's so that I could attach to the underside of the desk. This can be a little tricky. On this desk it was a tight squeeze and hard to see. I suggest grabbing a flash light and a longer screwdriver.


I then used some Rub-n-Buff to change the hardware from brass to a silver. I ordered mine from Amazon for a few bucks. (They have all kinds of colors and 1 tube goes a LONG way.) I then used a little bit of clear coat spray on them to hold the color. (Just FYI...if you don't put a clear coat, it will slowly rub off since its a waxy substance.)


Then I tackled the seat. I used the same fabric from the desk and the lining I bought. The lining is so I didn't have to rip off what was already on the seat but I didn't want the stripes to show through the lighter parts of the fabric. (Not all fabrics will need a liner.) You will just need a staple gun (sorry I forgot to take pics of the backside.)
Just pull the middle of one side tight and staple and repat for each side. Then pull the rest around and staple. You will have to play with the corners to get them to look good and not sticking out everywhere.


Once your finished, attach everything back and feel free to add some details. Me and my mom added some cute birds on the top and front. We sprayed a little clear coat over the painted details and across the top since she will be doing homework and it will protect it.
I am very pleased with the finished product and my little cousin LOVED it. So from a $400 inspiration to about a $130 beauty.

While searching the web for a cute idea for an old sewing machine table I saw your photo and its so cute! Most everyone made it into a bar and its not something I wanted to do. This is super cute and all I need to do is hunt a cute chair now! Thanks so much for such a wonderful idea!
ReplyDeleteWhat an adorable idea for a use of a recycled sewing machine cabinet. Your niece is one lucky little girl.
ReplyDeleteGreat idea. Beautiful design.
ReplyDeleteDo you happen to have a picture of the top opened, showing the tray?