Tuesday, October 2, 2012

This is Bat Country

So anyone at all who knows me knows that I absolutely love Halloween.
I am like the creepy Halloween lady in my neighborhood...I could run a haunted house in my own home during this time of year.

Anyways, I found this picture on Pinterest awhile back and have been craving for October to come along so that I can recreate this at my own house.

My inspiration.

Corkboard Facelift

I decided to give an old corkboard I had laying around a little makeover.

I had all the items I needed laying around but if you have to go out and buy this project will probably cost you $30-$40 depending on the board and stencil you buy.
This started as a simple corkboard you can buy at Walmart or Target (or just about anywhere).
I think this one was a RoseArt. See....pretty plain jane.

Now, you will need to pick a design. Just go buy a stencil for whatever design you want.

Fun Take on a Picture Frame

I actually did these frames as a birthday present for a friend. You could get creative on what you use for the frame...a block of wood, old cabinet door, etc. I actually have a lot of old wood samples from a furniture company from my work that I used.

What you'll need:
Whatever you are going to use for the main part of the frame
(Cabinet door, block of wood, be creative)
Picture
Accessories to add on
(Metal pieces, appliques, etc.)
Glue

So on these wood samples, one had a lot of texture and the other a lot of wax which makes it kind of hard to glue anything on. I had to use a paint stripper to remove the finish from the raised panel in the center.
(If you are going to do this step have a clean surface that nothing can possibly be ruined if it drips our spills.)
Wear thick rubber gloves, if the stripper gets on your skin it will burn extremely bad. Pour the stripper into something you don't care about: an old bowl our cup. I  used an old coffee pot I bought at the thrift store for a dollar for this very purpose. Use a paint brush and brush on the stripper. Let sit for about 30 mins. Use a paint scraper to scrape off the paint or finish. It may take a few applications to remove everything. Feel free to leave some for a rustic, antique look. When done clean with a damp cloth and let dry completely. I would use an old rag just in case it ruins it.
(Sorry I didn't get a picture of this)

Tuesday, September 4, 2012

DIY T-Shirt Scarves

So...if you are anything like me, you are always looking for new and cute scarves.
Well, if you really are anything like me, you hate paying for them. I am on a bit of a stricter budget,
so any money I can save is great.

I have several bags of old clothes that I keep meaning
to donate but as of right now,
they are dust collectors in my closet.
So, I went rummaging through them to find ones that I liked the fabrics of.

You are going to need:
Old T-Shirt
(The wider it is the longer your strands will be...The longer it is the more strands you will have)
Scissors

First thing you will need to do is lay your shirt out flat.

Friday, August 31, 2012

Missing That Which I Have Lost

Today I find myself having a rough day. It started out fine...getting stuff for my new desk at work and a few things for a craft project I am doing. As I am working on this, I find myself thinking very strongly about my Nana and my Grandmother who both passed early on this year. I never thought I would lose them both so quickly. I wasn't fully prepared even though I was at peace.

You never can truly prepare yourself for such a thing. Although I knew they were going to a happier place and would see friends and family that they too had lost, I still find it so difficult to cope with. Knowing they will never be around again for me to get advice from, or just a card even. Knowing that I will never see their smiles when everyone is gathered together for the Holidays.

I can't help but sit here, sobbing like there is no tomorrow. Sometimes I feel there isn't. How can there be when they are no longer here? How do you go on? I just want them back...I want to hug them, and kiss them, and tell them that I love them. I stare at their pictures and remember every single happy moment with them and every talk we ever had. I know I wouldn't change a second of any moment that I ever shared with them.

I strive to be a better person, someone they would want me to be and can be proud of. Its extremely hard though, knowing I can't pick up the phone whenever I want to just hear their voice one last time. To hear them say they love me again.

So, today is a tough day for me...

I just can't help but miss them with every single inch of my heart.


To live in hearts we leave behind
Is not to die.
~Thomas Campbell, "Hallowed Ground"

Sunday, August 26, 2012

Hand Painted Shoes

So I had seen an adorable pair of hand painted Toms on Pinterest. Of course I had to make these but I didn't care to pay $50/pair just to draw all over them. I found these on The Breast Cancer Site for $20/pair. Each pair I bought had a pair donated through Soles4Souls and I helped fund mammograms for women with Breast Cancer. So it was truly a win win.

What you'll need:

A pair of canvas shoes
(I got just plain white so they were easy to color on top of)

Fabric markers...I used the Tulip brand found at Walmart
(You can use fabric paint as well but that'll be much more tedious and time consuming. The fabric markers are permant, washable and easy to use.)

Imagination!!!

Thursday, August 2, 2012

DIY Shrug

This is a fun way to revamp an old shirt that was destined for the trash or Goodwill and recreate it into something new and fun. The purple shirt was a gift from a friend that never quite fit right. I loved the color and the beading and really didn't want to give it away so this was a perfect solution. My other shirt was an inexpensive shirt from Walmart that always looked a little frumpy on.

I originally found this on Wobiso's blog.

What you are going to need is:
An old shirt  (Make sure that it fits you before you start. If it is pretty small, it will be too small when you are done.)
Scissors
Ribbon  (Or whatever you want to use for the tie. You can even use the bottom of another shirt.)
Sewing Machine
Sewing Pins
Safety Pin  (This will be used to pull the ribbon through.)

Sunday, April 22, 2012

Another Amazing Woman Gone

So recently I wrote a blog about my amazing Nana's passing. It's been a little over 3 months. Well, early Thursday morning we lost another amzing persn in our lives.

My Grandmother. Wanda Jean Fietz.

She left us at about 5 AM that morning. This was so sudden for us. She had been taken to the hospitalbfor nausea and weakness and turns out she had had a heart attack. No one knew. She had had no pain at all. But this just shows you how strong of a woman she was. She even knew that she woukd be leaving us and going to join the Lord. She had a Guardian Angel she had told us about on many occassions. I believe she had told her she would be leaving us and making sure she got to see as much of her family as she could and saying goodbye to her friend.

She was amazing in that aspect. I always loved her stories of incidences of her Angel or other stories of her life. Even though I'd heard them many times, I nevermind hearing them. My favorite was of when she was younger, she hadbeen in downtown OKC to do some kind of testing for the IRS and hr and a frind had gone to eat in an undergroun mall there when apipe had bursted. They had to run to escae the flooding water, when the escelators flattened out for emergency reasons ti avoid shock from the water. She told me of a man that helped to lift her and her friend up iut of the area. I loved that story, even though I'd heard it many times. I still have not visited this underground mall. We always talked of going together. I still plan to find it and witness the setting of one oof my favorite stories.

Monday, April 16, 2012

One of the greatest women in my life

About three months ago, I lost yet another wonderful person in my life. But this time, it was the closest person I have ever lost in my life.

My Nana.

LaVonne Lake

She was an amazing person. She was strong and independent and everything I strive to be. She raised 4 children almost alone while my Papa was in the Army. They moved to Lawton, OK finally from Rockford, IL.

We were so close since she used to babysit my brother and I all the time when we were younger and lived closer. She wasn't that typical grandmother, that I didn't really know and just shied away from. Although, she lived 4 hours away from me pretty much all my life, I was extremely close to her. I could talk to her about anything. She always made an attempt to come see my dance recitals when she could, which meant the world to me since dance was a huge part of my life growing up. She was always sure to send me cards for every occasion, newspaper clippings of articles she thought I'd like, recipes, religious books, health tips she'd cut out from magazines and much much more. Even though I'd only see her a few times each year, its like we'd never skipped a beat.

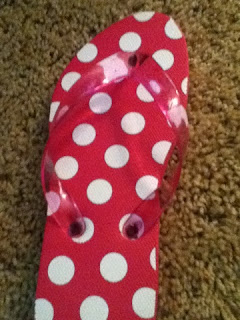
Flippy Floppies

I have been making these flip flops for years, since I played soccer. They are great for teams, fundraisers, gifts, or just for yourself.

You will need a set of flip flops. You can do a plain or patterned like I did.
The thinner the band across the foot the easier this will be. These particualr ones were a little thick.

Then you will need some fabrics. You can mix solids, use one pattern, or several like I did for this post.
I got these, 5 pieces of 18" x 21" pieces from Hobby Lobby for $9.99. Pretty much anywhere that sells fabrics will sell scrap pieces which are great for this, but don't feel bad to go pick some fabrics from a bolt.

A pretty place for the birds

I found this little birdhouse at the thrift store right by my house for a $1.98. I have been wanting to get one and always love a fixer-upper chalenge.

I took out the fake bird that was glued in the hole.

I then painted the house using acryllic paints (I love the Folk Art brand the best). I did the body turquoise and the roof red. it took several coats to cover since the original was pretty slick and I couldn't find my sand paper to rough it up.

After I painted it, I sealed it with Krylon's spray clear coat. Since its going to go outside, I wanted the paint to be protected from the elements.

Then, I just added some little details from Hobby Lobby. I drilled a hole in front for a knob (added a little glue to help secure it). Then I glued on a rusty metal cross on back and butterfly on the top.

It turned out so cute. I love and and so do the birds.

Wedding Card Keeper

So I needed a creative little gift to give one of my best friends growing up for  her wedding. Yes I will also get the traditional pots or pans but I am a crafty person and jsut crave making something special for people.

So, I decided on a card holder for her to put all of her wedding cards in.

You will need:
Cardboard or Model board
At least 3 different kinds of paper
Glue
Ruler or Measuring board (you can see in my photos)
Scissors or an X-Acto knife
Ribbon or Lace
2 Brads
Metal Ring that opens
Any kind of details you want to add
*I found all these at Hobby Lobby 
but you can go to any kind of craft & hobby store


 Typically, if you are making this for yourself, then use your cards to measure out how big to make it, since I am making it for someone, I tried to find one of the largest cards I had and used that. You will want to make it about a 1/4" bigger on each side.

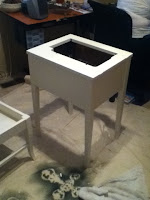
From a Sewing Cabinet to Desk

So for Christmas, I decided to make my younger cousin Josie a little desk. She fell in love with one at my work but I was not about to spend $400 on a desk. So I went on the hunt for a small desk and chair, scouring thrift stores and little antique shops. I came across an old sewing cabinet and an old piano chair (one where the seat lifts up for storage) at this great little place in OKC The Feathered Nest. The desk cost me $30 and the chair $24.

I went to Walmart to get some Glidden paint. I bought 2 pints in a soft ivory satin. These cost a total of about $26. Feel free to choose any color. I chose a white to match the furniture in her room. I also wanted it to be a piece she could grow in to.

You'll first want to wipe down the furniture if its a little old and then lightly sand it. It took me about 2 coats to cover it well. Also, if it is in parts like mine was, I suggest taking everything apart and all the hardware off.

To go below the opening in the desk where the sewing machine would typically go (I wanted her to be able to lift the top and have a little built in drawer that she could store her supplies) I bought a simple tray for about $25 and some modge podge for $5 at Hobby Lobby. (Just so you know, most the time they have half the store 1/2 off or you can get a 40% one item coupon on their website every other week.) I then bought some fabric and lining at Interior Fabrics for about $16 total for a yard of each.

I folded it to fit the inside of the tray bottom and used a little spray glue (I recommend using another type of glue if you plan to do this for a tray that you can see every detail because its very messy and stuck to the sides.) I then used a modge podge to make a clear sealant. When doing this over fabric it may take 2 or more coats to get a smooth finish. It took 3 for this tray. (I love it so much I want to make one for my living room.)

A Diaper Cake That Looks So Good You'll Wish It Was Real


So for my friends baby shower I took my first attempt at creating a diaper cake out of the gifts I bought. In my cake I have:

Diapers (I bought a 76 pack, you'll want a larger quantity if you want to make a larger cake)
4 pack of receiving blankets
A small stuffed plush
2 pack of caps
5 pack of onsies
2 pack of pacifiers
Rubber bands
Foam core board
For the "candles":
Paper
Scrap booking letters
Toothpicks

The first step is to roll your diapers and wrap a rubber band around them. After a few tries, I found it was easier to roll about five (1 for the center and 4 on either side) then wrap a rubber ban around. I had about 8 on the top tier, about 24 on the middle, and about 45 on the bottom. I put 2 rubber bands around each tier and spaced them out so they looked more even. Otherwise, it was really tight in the center and flared out on the top and bottom.